Wednesday, December 9, 2009

Luciana Alberto FInal


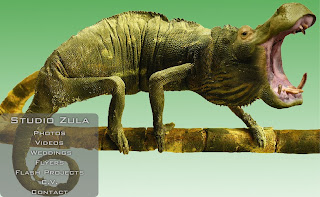
This is my final Project. I made a website and programed using actionscript 3 in flash CS4. It was a lot of work and took a lot of research and time. The picture in the background was created with few tools such as bezier curves.
This was very complicated and very rewarding to do. I am far from the end result I want for my website, but I will continue it by the end of the year.
I have got lot's of buttons with many functionality and used animation, frames, simbols, shapes.
I merged in the end with dreamweaver and you can view what I have gotten so far in http://studiozula.com/ wich cannot be displayed yet in firefox, but you can use Internet Explorer and Safari.

**Update**
I noticed I forgot to mention I added a non loud crickets audio on the project. And Kinematics were added into the flash projects page.
http://sws.pcc.edu/student/CAS175_pdeangel_45513/lucianaalberto33/final/Final.swf

Tuesday, December 8, 2009

Final: Diabolical Smileys - (Lazarus)


Well, the mother of them all was rough! lol - actually, it was pretty fun to do... but having to force yourself to incorporate all the tools is the hard part.

I managed though, and more or less have a coherent "ad" I guess. This project is called "diabolical smileys" and it's a basically a culmination of all the evil smileys I've made in this class. Essentially there are four smileys attacking the city...

Smiley A is a motion tween, falling straight from the sky into the city.

Smiley B is a morphing shape tween, morphing between a smiley and a square as he flies accross the screen.

Smiley C is a kinematic smiley with tentacles that crawls across the screen and roars.

Smiley D is an interactive, nuclear smiley - he sits there, and if it were live, he's a button. you hover the mouse over him and lighting bolts zap out of his head, if you click on him he glows green!

Once the smileys do their damage over the city, they move on.. then..

I used the pen tool to bring in some splattered lines that animate across, eventually using brazier curves into a big smiling evil mouth and eyes. Then the link for diabolical-smileys.com appears across the page... it's interactive, and brings you to this blog.

I did every thing required and more in the project, with a LOT of symbols, and free paint, fill, and just about everything thrown in. The only things not added were stop animation feature and a sound effect.

It was fun! Look forward to perfecting this trade!

- Laz

Project 4 (A bit Tardy) - Lazarus


Well, missing the last day for action scripts was bad news... lol - I tried, and I kept getting errors. As this term has been hectic in a personal way, I did the best I could. I've got buttons on there, they are mostly coded right, but they don't actually start and stop the animations.

Overall, we're getting into the stuff I love - animation - and this is a great springboard into doing motion comics - which Im' trying to get into.

This project was fairly simple: I have a mechanical arm that's bouncing around (and eventually catches, though it squeezes out of it's grip) a red rubber ball. It was very fun to use the tools we've learned so far. Everything here is a symbol, obviously - but the arm is kinematics, and the ball is actually separate layer that I used motion tweening to do the animation with.

Anyway, it's very fun! Now I'm finishing my late Final Project, lol!

Brianna Barcus_ Final

I made a document full of objects I might use. Including ornaments, the trees and stars. I created a sort of decorative flower, for the tree and the snowman using the pen tool.
I used mostly classic tweens for the ornaments and lights. One ornament was done using a Motion tween. And the star in the sky that grows a little was done using a Shape tween.
I used Inverse Kinematics to animate the snowman so he could wave I nearly forgot that I needed to use symbols to get it to work though. It's very interesting to watch what happens when you don't use symbols!
I added a sound to go with how the star moved to the top of the tree. It was slightly tricky since I couldn't figure out how to attach the sound to the movie clip for the longest time. And I had in my head that sound was supposed to be on a seperate layer from everything else.

I used a lot of symbols in my project. All of them were new. Ornaments, trees, stars, the moon were all symbols.

I created each button brand new. Two of them, one green, one red for stop and play.

Added a seperate text link that goes to a really awesome website everyone should bookmark!

I think the actionscript is the most challenging for me. I am such a visual person that writing each little bit of code and testing it out annoys me. And it's SO complex I know now why I'm a designer. I admire anyone who can memorize even a little bit of code.

This project was fun. I enjoyed putting all the different tweens in one project. (Classic is my favorite)

-- had some serious technical issues with the blog. Won't let me upload the video, I will try again later..... (again) (tried earlier and the same thing happened)

Monday, December 7, 2009

Fullmer_Final
I’m struggling with IK and don’t know why the function doesn’t want to behave for me. The rest wasn’t too hard. The train and track is a movie clip while the shooting starts (w/ a motion guide) are all tweens/animations. I added a train sound for the audio clip. The moon turns the animation off. I enlarged a small star and turned it into a button that connects to an absolute URL. I added script rather than use a text link to maintain in integrity of the design.

I must be experiencing computer or connectivity issues or both. My .mov wont upload to this post, I'm getting an error that's telling me to technical support. I also had trouble with my moon disapearing although the button functionality was still working.....who knows what's going on here???? It's too late to try and figure this out.

I uploaded all my files to both my SWS final folder and the shared final folder.
Steph

Final - Christian Boneta

I used motion tween on the thunder classic tween on almost everything else a shape tween on the stick-man - The Dragon is just IK armature did used 2 different gradients for the background reused some symbols like the rock but had to make a few new ones like the sword and the little dude going up classic tween on the clouds. Used 3 sound files one from a roaring lion another one from a thunderstorm and a ambient sound to give it a blizzard sound cause his high in the mountains. link URL and a restart button cause i could not find a tutorial to find the stop start scrips at all, they where all old version that dint work for action script 3

over all it was interesting. The challenging part was the scripting but that was my own fault for being sick that week and all the tutorials i found were old and out of date

Final Project Ginnie MacPherson

Ok, let's see if this can be somewhat brief. Required elements: some motion tweens used are the barrel, brick wall and monster getting bigger within the beginning of the the movie. The fire in the barrel is a shape tween. The monster's hands moving back and forth by the fire is a classic tween. The tree moving (in the wind) is an armature.
The barrel and wall are drawn with primitive shapes, the monster and fire with bezier tool as drawing objects turned to symbols.(Avoid the merge shape is my mantra, maybe it will be useful at some point,)
The movie clip symbol is the oval at bottom left. I followed the book example, though I'm not sure how to code it to work, to be honest. There are a bunch of graphic symbols created for the motion tweens used. I did not get to make an audio clip as I ran out of time. I wanted to have a happy monster noise at the end . . . maybe will add it later. For the button requirement, I made the "stop" button with different states. I could not get the Actionscript to stop the movie, however. There were some errors stated by Flash in the code, but I lacked time to get that sorted out. Actionscript is still a bit of a mystery at this point. Got the "start"button to work in Assignment 4, but not a "stop" button yet. The url link was thankfully easy at the end of the project.

What worked well? Drawing the scene was fun and pretty easy. The buttons and Actionscript were challenging. Hopefully that will become easier in the future.

The almost final, Final

Ok, well it didn't go exactly as planned.

Here is the link to take a look at: it sws.pcc.edu/student/CAS175_pdeangel_45513/nathandavis21/final/
What I did was made a shape tween to make it rain. I then did a motion tween to move the sun and the clouds. I did a classic tween to make the flower "grow". Finally, I did the kinematics tool to move the caterpillar, to eat the flower.
I then added some text as a symbol and used that symbol to have the "hooray" sound play.
As far as the button goes....it was SUPPOSED to take you to a link about the water cycle, and top the movie...but I was gone the week we went over it. It was my own hubris that made me think I could figure it out. Well two days later, and dozens of compiling errors, I still couldn't get it to work right. If anyone is reading this in the next....3 hours and wants to email me how to do it before the deadline, that would help. zombiefoxx@gmail.com

Darby Hasbrouck: Final Project


I used PowerPoint to create my storyboard for this project and get an idea of what I wanted to do with the animations. I imported all of the forward facing houses from assets I had on file. I was able to resize them and lay them out in a row. I then grouped all of the houses together and converted them from to a symbol. I did all of this in a separate project then imported them into my final project via the library.

I used a lot of the drawing tools to create the truck. The truck, road and grass are a combination of merge & primitive shapes as well as objects. I’m much more comfortable using the pen tool now than I was in October. The window and the shape of the cab of the truck and tree were created with the pen tool. The truck and tree were also created on a separate project that I opened specifically to create these assets with out interfering with the other graphics in the project. I find it’s a lot easier for me to create these assets on their own project and then import them all into one file. These two items are the two symbols that are required. (The fla files for the truck/tree and houses are included so that you can see I actually did the work.) I used a classic tween to give the clouds a little motion. The effect of the buildings moving is my motion tween. I used the shape tween to create the effect of the sky getting darker.

Rather than simply adding a sound effect I wanted to add some background music. To do this I was told that all of the symbols in the file needed to be movie clips. I imported the sound file into library then created a layer solely for the track.

I created the buttons and changed the properties on each state of the button. I played with these buttons for 5 hours and I can’t get any of the action script to work. The stop won’t even work! I’m so disappointed because I know I’m going to have to take a hit on my points. Fingers crossed I do well on the final to make up for the 15 points I’ve missed on this project.

Brian Jepperson - Final Project


Well here it is, my final project. Note that the video above doesn't show all of it, since it's interactive. Click on this link to see it in flash.

The snowman I made with some primitive circles, and the arms, hat, nose, and scarf I drew with the pen tool and filled it in, then made it into a symbol. The scarf used bezier curves. There are two tree symbols, but I duplicated them, scaled them, and flipped them to give some variety. For the snowy hill background, I painted it in three layers, ground, water, and snow on top. For the falling snow, I made a really big rectangle that is about twice the size of the stage, and then used the deco tool to spread snow flakes all over it. Then I animate that big rectangle downward.

For animation, the snowman's wave is obviously done with the bone tool, when the snowman slides I use a motion tween, and snow foreground uses a classic tween. The silly little CAS 175 sign in the upper right uses the 3-D tool to achieve the wierd spinning affect. If you look closely, the Merry Christmas text changes color. I actually have a gradient that reverses itself which gives the appearance of flashing. That was done with a shape tween.

I have three buttons. I tried to make them look website-ish. One starts and stops the animation. One takes you to a cool little Santa flash site, and the other makes the snowman slide down the hill. The start/stop and slide were achieved pretty simply making taking the control to various parts of the timeline. The only sound I used was one attached to the buttons. When you click the buttons, they make a slightly annoying little clicking sound.

What worked well? I like how the snow turned out, and I'm satisfied with the buttons. Challenging areas are always the artistic parts for me. I probably spent 3/4 of the time on this project just trying to make a decent looking snowscape (the hill and the trees). I'm still not totally satisfied with that (it's kind of amusing how the snowman is so HUGE relative to the trees, lol) but oh well.

Need some help

Hey classmates,


So this is a little out of the ordinary, I am sure, but I need some quick help.
I am done with my project except the button to stop the animation and get the URL. I was gone that week of class and I CANNOT figure out how the heck to do it, even with with book.
Could someone send me a quick email with a link to a tutorial or something? I looked online for a whole day and everything seems to be old (macromedia flash 8). Any help would be appreciated. zombiefoxx@gmail.com is my email.

sorry for posting to blog, but I know people will be looking here today. thanks!

Sunday, December 6, 2009

Elizabeth Wyman Final Project

I used a variety of tools to create this project. I used Classic, Shape, Motion Tweens, and Inverse Kinematics to create animations. I also added sounds to my bird movie clip and my dog animation. I used text to link to this blog. I used a classic tween and armature to create the clock. I used a classic tween for the water drip. I used a motion tween for the bird movie clip and the bouncing ball. I created two buttons. One to stop the main timeline and one to continue playing it. Both buttons had 4 different states. The most challeging this was getting my clock hands to animate properly. They kept flipping the wrong direction. I also discovered my movie clip does not stop with the rest of the timeline when I use my buttons.

Final- Jeff Ashmore

For my final project I first created the zip line using the bezier curve to get the bow in the line. Then I used the line tool to create the towers, and the pencil tool for the person on the zip line. Next I created the sound button with a rollover sound and when clicked on a different sound. Then came the star with a shape tween/ motion tween. Next was the armature circles that a animated, and finally the link button to the instructions for creating it. The part that I found the easiest was the url link, and the most difficult was the sound.

Project 4 Ginnie MacPherson


Challenging project. First I tried to create an animation using the IK shape and also IK with symbols on the same armature. (Doesn't work). Then I attempted an IK shape using an octopus with several tentacles. That didn't work as the illustration was imported from Illustrator. Probably having and IK shape with several connecting "worm-like" shapes is not possible. Finally I decided to create a walking unicorn. (Well, it was going to be galloping, but that is a rather difficult sequence of leg movements to capture. Walking finally came together.)

Having symbols in the IK armature was sort of confusing. You have to turn your shapes into symbols before you can create an armature and "put it through it's paces". But if you discover that your symbols need editing when "putting through paces" reveals funky shape issues at the joints, you can't go back and smooth them out. Kind of a catch-22. How can you know before creating un-editable symbol armatures that you may want to edit them once they are movable? If that makes sense at all. You can see on the back of the unicorn's upper legs, sharp angles point out in some positions when he's walking. At any rate, overall it works pretty well so that was a success.

The .mov file's too big to upload. in fact Flash wouldn't create a .mov file. Probably because the file is too large in memory size. Darn, it would be fun to share it. Some people made links to theirs. Hmm, how does that work?

The buttons weren't hard to create, but the Actionscript was a challenge. My "begin" button finally works, but I couldn't figure out how to make the stop button work. Not too sure if having the "begin" button functioning is an Actionscript mouseEvent or not, or if it's just basic Action Script. I didn't figure out how to add a stop in the last frame to stop the animation, either.

Final--Peterson

I never really had an idea of what to do for this project. I had a vague idea and a lot of it came together while I was doing it. That's why it might seem a bit weird. I started just giving a background to the picture using most of the animations required. Then to do the IK I drew each piece on seperate layers. I should have zoomed in more to draw it because if you zoom in you can see the ragged edges from drawing it small to begin with. The I set the body where I wanted it and pulled in a body piece far away from the main part and connected the bones and after they were connected I would move the body part to its proper position. I find it hard trying to create pieces that dont move out of their socket during animation.
The link is to a cultural site on Irelands Gaelic TV channel. The word means dream. I thought I'd choose it just cause the whole feeling of the movie is a bit wierd. The stars have two different animations shape and motion and the shine that moves across the blue circle is classic.
I took the sound from a Cure song and added it to the stars because it sort of has that sound to it.
The hardest for me was connecting the button and writing the correct code. Also finding some sort of inspiration to get the project done was kinda hard as I've been on holidays for the last two weeks in Ireland. Other than that, I enjoyed making the stars and even though struggling with IK animations, Im enjoying attempting that as well. Happy holidays to all!

Saturday, December 5, 2009

Final - Vincent Phan


I decided to tackle the IK first, since I thought that would take the longest. I created the arms and hands using the pen tool and bezier curve, the torso and legs with the rectangle tool, the feet with the pencil tool, and the head with oval and brush tool.

The ball layer has a combination of a classic tween and a shape tween. It starts off with the classic tween when its bouncing up and down. It then switches to a shape tween when it's just laying there on the floor, it is slowly inflating near the end. The ball is a graphic symbol.

The fly is moving around the room with a motion tween. I created the fly by zooming in to 800% and make a small black oval for the body and two smaller grey ovals to represent wings. This was then converted to a movie clip symbol.

The play and stop buttons in the top corner are button symbols that have 4 different states set to them. The red square stops the timeline when clicked on, and the green triangle resumes the timeline when clicked on. Also, there's a hyperlink on the bottom corner that opens Google in a new window.

Lastly, the sound. I took a .wav audio file of Austin Powers off of FreeAudioClips.com. Surprisingly, it fitted into the timeline just fine.

What gave me the most difficulty was the coding. When I created the document from scratch, I set the script to ActionScript 3.0, and so the whole time I was coding with Actionscript 2.0 while not thinking it was a big deal. Eventually, I set the document script to 2.0 and everything was working again.

Thursday, December 3, 2009

Final Project - Jeffrey S


Here's my final project. I created a few symbols on here. Lets start on the left side. The tree has a few layers. There is the tree trunk and branches. On another layer are the fall leaves which hide two other layers of falling leaves and a portion of the rope. I had the leaves fall from the tree using a classic tween, which I thought was really cool to do when you could make the leaves move side to side and flip them giving it a little depth. The tire swing was done with a little bit of armature having small sized rectangels attached to one another with the final piece being the tire swing.

The tractor that you will see which moves from right to left has a couple layers. I thought this was difficult because I needed the tractor's hull to move with the wheels and the wheels to go in the right direction. I needed to a bit of easing to make the wheels go in the right direction. I added dirt to the wheels so I know the wheels are going in the right direction.

The barn is a barn

Lastly, there are 3 buttons. The STOP sign stops the timeline of playback. The GO! button begins playback of the clip and also there is a sound effect to it when you click on it. The top button is a link to another site called the Oregon Farmers Market. I just picked this site because it just seemed to fit.

Anyway, I had a great term and this was full-filling to get some experience on FLASH, Thanks!!

Sunday, November 29, 2009

Project 4 Elizabeth Wyman

I enjoyed making my dancing monster although I never could get my stop button to work. I used all symbols to create my monster's armature. I just felt that they were easier to work with. I did use some shapes for the background grass however. I used a couple of different layers and armatures for my monster to be able to have greater range in movement. I had one armature for his head and ears, another for the arms, and another for the legs. I created the button using a modified shape and text that I turned into a symbol. I edited the button symbol so that it had four different states.


I wish I had started on this earlier before the Thanksgiving weekend and it might have helped if I showed up for the last class.

But, this is what I have accomplished. Meet excercise man! You press the button and he will excercise his arms.

To complete this project, I made a few symbols using various different body parts. I linked each of the body parts together using the bone tool. The parent bone started at the chest and child bones moved out to various points of the arms.

Using the frames I moved the structure of the arms and placing restrictions when needed. Then I added a button. The hard part was figuring out the actionscript, but I ended up getting it. I included my name on the picture, because I wasn't sure if that was supposed to be the watermark portion?

Wednesday, November 25, 2009

Brianna Barcus - Project 4


This project was a lot of fun. I probably did about four different prototypes of my dancing man. The constraints were really hard to control and figure out so I just decided to give him free reign. To view him please go here ~ link

I decided to have some fun with actionscripting and add not only a stop button but also a start button. Which was fun to do, especially when it worked!

As for the dancing man, he is made entirely out of symbols. After working with symbols so much I think they are so much simpler to use then individual shapes. Definitely makes things easier.

If at some point I could figure out how to make the constraints work better I think this would be even more fun to play with. Though making something do a split that would be impossible for a human to do is way fun too!!

Happy Thanksgiving all!

~Brianna

Fullmer Project 4


I created an animated armature, the arm of the Tonka Truck, using Ik. I used the bone tool on each portion of the arm and the black rope. I converted the pieces to symbols and used a shape for the blue ball at the end of the rope. The button was created in the same color pallet as the Tonka Truck, click the button to animate the Tonka truck. The Button contains a mouseEvent and stop action. In order to publish the movie however I had to remove the stop action in the first frame....so...if you want to see how it really works please fo to the SWS and play the .swf file.

Jeff Ashmore-Project 4

I created my project starting with drawing the arms and hands with the oval tool. Next I used the bone tool to connect all the symbols. Then I created all the frames for the movement, handshake, and wave. Next I created the button, and used this action code to control the animation.
stop();

function startMovie(event:MouseEvent):void
{
this.play();
}
playBtn.addEventListener(MouseEvent.CLICK, startMovie);

I tried to get the extra credit complete, but with all the different codes it wouldn't work for me.

Darby Hasbrouck: Project 4


I wanted to create a clock for my armature. The only symbols I used in this movie were the clock hands and the button. The rest were simply objects or text for the numbers. I can’t seem to get my numbers to stay situated though for some reason but I wanted them to come in one at a time as the hand winds around. Obviously the bone tool was used to get the clock hand to rotate. And I cad to constrain the hour hand so that it would stay put. It took me a little while to figure out how to change the text on the button but I finally figured it out!! Adding the stop in the movie was fairly easy so that should do it for Project 4. Have a great Thanksgiving!

Pamela Peterson Project 4

I only used symbols for this project and I used all of them because I only created a symbol for each part of the guy's body. I started with the head and each body part I added I immediately added a bone structure. I initially created the entire body but it proved difficult to add bones to the structure when there were so many other symbols in the way. I had problems too keeping the body joints together and as they moved they would appear to be unattached to the rest of the man. The button I wanted to attach an action to stop the man but when I did so it took away the end stop, so I deleted it and forgot about the extra credit option. I also found adjusting the constraints on the joints to be tricky and suspect its somewhat of an art to get it to work well. Happy Thanksgiving

Tuesday, November 24, 2009

Brian Jepperson - Project #4

Well, this is my project.

The robot was created from several different symbols (head, torso, arm, forarm, wheel) attached by "bones".

It starts with a short animation and then it hits a "stop" in actionscript. At that point two buttons appear, and you can either raise or lower thee robots arm. This is achieved by handling the mouse click event and doing a gotoAndPlay to an appropriate place on the timeline.

Thursday, November 12, 2009

Brianna Barus Midterm


This project was a bit of a challenge for me. Especially when it came to the pen tool, I think I've mentioned I hate the pen tool. (it's the white swirl thing on the left side of the picture). I had some issues with Flash the past week. For some reason when I finished it and tried to upload it it would upload only a blank screen. It was so weird and after messing with it and messing with it I ended up just making it all over again. By that point I decided to go for something really easy and fun.

I decided to go for a really simple story-board as opposed to something more complex that I would have to reproduce, so I just did it showing the major movements of the two balls.

I imported the cloud from my project 3, and changed the blur and transparency to make it different. The moon I made by adjusting a circle. The hills of snow were two half-circles, and the fun swirl to the side was made with the pen tool and Bezier curves, I combined them into a symbol in case I wanted to use them in a future project. I made the blue and red balls out of just the shape tool and converted them into symbols to use in the project.

I put the background on it's own layer which contains all of the non-animating elements. The cloud is on it's own layer, and both of the balls each have their own layer.

I used the cloud as my frame-by-frame animation, which I think turned out okay. Frame-by-Frame is not my favorite, I prefer the Classic Tween. I used the motion tween for the blue ball, and the classic tween for the red ball.

Lazarus Mid Term


This project was very, very entertaining. I had this picture in my head of a psychic trying to bend a spoon with his mind, and figured the animations on that would be appropriately easy for our current skill levels. So I ran with it… though originally, the project had a much broader scope than I ended up with. I was planning on having a lot of are damage occur—the desk break, the walls start to bend, the background get destroyed – what I ended up with fit the size (I recall her saying “do not overdo it”) of the project and do it well.

The hard part about these projects is getting all the stuff you need into what your imagination says… namely the pen tool, lol – I hate that tool!

But let’s break it down piece by piece.

Storyboarding: I did a pencil storyboard, which I did by pencil. I ended it early there knowing it could go on, and basically did “Half” a storyboard – intending to do more if I had the space. Little did I know how cluttered things could get quickly.

Multi Layered: Man. This thing has a TON of layers. It has to. I created 2 primary folders; Foreground and Background. Within Foreground, there was a folder for the Spoon, the Papers, the Dude, and then just a layer for the single Desk layer. Within the Background I had a folder for the Window (and it’s cracks).I needed the multiple layers because of how many motion tweens I used, and how various parts of the scene were changing constantly.


Drawing Objects: I mostly used the Paint Brush and the Line Tool - though I also used basic Rectangles... despite how much I dislike it, I used the pen tool to create the Spoon (though it ended up being useful because of how i needed to resize it before I made it a symbol.


Symbols: Man, I have a ton of symbols. The Papers were handy, because I had to troubleshoot so much to figure out layers, I ended up deleting several layers, and just dragging the paper sheets over. Very cool. Symbols were very cool to work with in this context.


Frame by Frame: the original first ten frames are frame by frame. That's basically him moving over to the spoon.. I wish I could've made it slower, but that's okay.


Tweening: Man, I used a ton of them. A LOT of motion tweens, and one classic tween. The motions were him moving, the spoon moving, the papers moving all over the place. his twitching in concentration was amusing to me. This is where I had to end it early, as I was feeling it was already getting very long for the project - there are no shortage of tweens and layers in this thing. I could've gone on for quite a while.

Wednesday, November 11, 2009

midterm


ok well first of the sky is suppose to be blue and theres clouds that i made move using different kinds of tweens. second i drew each one as a different primitive and so on shape. i made them move across the screen using classic and motion tween. then i made the sun move around in circles using frame-by-frame animation. and then used classic tween to make a guy walk down the path and disappear out into the distance. i also used the pen tool to make the tree.

Jeff Ashmore-Mid term


For my mid term project I made a figure and a skate board move around the frame with tweens. Using different layers for each movement. For the rest of the mid term project I made a moon with a ring around it, and a flag which I turned into symbols. I used the bezier tool to complete the ring, and gradient for the colors.

Nathan Davis-Midterm

Ok so for the graphics, I did one spider in primitive tools and the other using normal ones (as well as the box). I then converted each spider, the box and the lid to a symbol and put them each on their on layer.

http://sws.pcc.edu/student/CAS175_pdeangel_45513/nathandavis21/Midterm/midterm.swf

I created a frame by frame for the box shaking, a classic for the spiders jumping out of the box (with a motion guide), and them landing on the ground. For the "webbing" I did another frame by frame till they merged into the circle. I then did a shape tween to convert it into a skull and crossbones. (Windings capital "n" then 'break apart') Finally, I used a motion tween to may the skull fade away.

Midterm-Christian Boneta


Midterm

the water was a simple object using gradient to, the character was multiple symbols applied classic tween and the rock at the bottom of the character also to make it come into play.
The sun was a shape tween that gets larger with the movement up and the color changes as it leaves the water.
The boat was a re-use of one of my previews projects changed the colors by editing the symbol from last time. The boat also comes in on a motion tween and is a mix of square shapes and the use of the pen-tool and free-form transformation
Did a frame by frame animation with the ball that's dropped onto the ship and hits the deck and blows up on the boats spike. used onion skinning here to get a better idea where the ball was going to drop.
To make the rocks i used the pen-tool and the line tool and also bezier curves to give it the shape then turned that into a symbol

Named all the layers accordingly and used about 8 layers I try to keep things separate that way its better to manage
At the end added a action script to stop it.

for the story board just used flash and made it with about 5 frames. They basically explains how things are going to develop.

some drawing classes might help me after this to make better looking objects and shapes.

Darby Hasbrouck: Midterm


When Stephanie says that she was “tasked” with building a simple eCard to sell to our clients, it was really me that volunteered both of us. So my midterm project also ended up being holiday themed.

When I sat down and started to storyboard I decided to make the graphics that I wanted to use and lay them out according at the different major transition points. I then took screen shots of each of these points which I used as visuals in a PPT file to represent the story board. Then I went back to the movie and completed the animation between the transition points.

I created the snowman with the drawing tools in flash as well as the night-sky, snow and moon. The tree and the sign were simple graphics that I imported into my library. Once I figured out where I wanted everything I adjusted the layers accordingly. I grouped a lot of symbols together to create my snowman and made sure all of the necessary layers were in the same folder. Probably the trickiest part to the snowman was using the lovely Bezier curves to get the scarf just right.

This project used both classic tweens and motion tweens. The classic tween was used to give the landscape a zooming in effect and the motion tween was used to bring the snowman and text on screen.

This was a fun but time consuming project!

Luciana Alberto Midterm Project


The hardest part of this project was to draw the car and to animate the wheels. I used bezier curves in the whole car and used some shape primitives on the lights.
I used a rectangle tool for the sky so that way I could use the gradient tool.
I noticed when I tried to export the video it is not quite running well, but I will try to figure it out later what is wrong with it


Midterm P. Peterson

The palm tree leaves are made with bezier curves. All others are shapes or objects besides the bird which I just used the pen tool for. The sun is actually rotating with its axis below the bottom of the page. The ocean that looks like it reflects the sun is a long rectangle that moves along a line to give the imression that the suns actually doing it. Theres a separate layer behind the ocean rectangle that makes the waves. I originally just had that but it was too "flashy" and choppy and didnt reflect the suns position at all. The bird is actually 3 separate symbols that were created using a motion tween on 3 layers. To make it advance/ "fly" forward I did a simple frame by frame animation using chucks of frames and repositioning each as I wanted the bird to appear to move through time. The larger palm tree also has a few classic animations applied to it throughout the movie.

Tuesday, November 10, 2009

Midterm Elizabeth Wyman


First I drew all of my objects and arranged them on different layers. I then created folders to keep them straight. Some symbols like the trees I converted to symbols so that I would not have to draw them multiple times. I also made the bunny a symbol so that I could use a motion tween. The sky, star, train, and train wheel were all classic tweens of one sort or another.

Midterm_Fullmer


Midterm_Fullmer

This was a fun project…very hard and time consuming but fun. I was tasked with building this project in such a manner that one of our developers could take it and slightly modify, building it into an e-holiday card. We sell these to our customers over the October-November time frame and the VP of Production thought it would be a good time to develop a couple more templates….
The storyboard that accompanies this project was a simple animation with once character, the old man, who is hit with a snowball and nearly dumps his packages. The snow ball fell to his feet and a snowy file would end up at his feet. He rights himself and is “Good to Go”. After building that much I realized that it was boring and the other developers would have a tough time using it as a template so I added the kids having a snowball fight. The snowball fight gave more basis for the rouge snowball that ends up hitting the guy holding the packages.
To get to the meat of it, the storyboard was a hand sketch which I scanned and emailed to myself as a pdf. My man, alone, is quite a few layers as is the stack of package. This was necessary in order to accomplish the frame by frame animation of the packages getting tussled then ending up back in their stack. I have all of #3 covered in the kids having the snowball fight with bevier curves for nearly every body part along with primitive, merged and object drawings. The snowballs were made with the oval tool and the snow on the ground was shaped with Bezier curves.
I must have close about 121 symbols in my library, some new and some recycled and others are duplicates. I was afraid to delete anything for fear I’d mess up my project. Some things I didn’t end up using but I figure they’ll just be available for another project.
There are a couple frame by frame animations. You’ve got the man with the packages, the snowball fight and the boy making a snowball (the 2nd & 3rd were converted to movie clips).
The tweens are used for the flying snowball, the snow and the snowball fight. There’s a motion guide for the snowball which you should be able to see in the attached image.
Oh and the snowflakes are movie clips that rotate while they fall and this was the toughest part….they kept falling from the middle of the stage and only to the right hand side. I’m still not sure I can replicate the fix as I had help from a developer for this since it gave me such a problem. I could get them to work just fine if they were on a stage by themselves but as soon as I put them in with everything else they seemed to “brake”. I purposely left one attempt at a fix in my layers of the FLA just in case you wanted to see my thought process…..those layers are hidden so they don’t show up in the finished movie.
When we convert this to an e-holiday card we’ll insert the clients logo and add a music track!
Stephanie

Sunday, November 8, 2009

Midterm - Brian Jepperson


After roughing out the storyboards, I created movie symbols from my previous three projects and put those onto the stage. The glass on the title page is a classic tween with a motion guide. The text is just frame by frame animation.

The second part to this video is a face where I do some expressions by using shape tweening. I have the mouth on its own layer. I had to do that because it was doing some odd things before I did that. The mouth was merging into the hair and ears and other wierdness.

The last part of the video is just a ball bouncing along some moving and stationary platforms. I used a motion tween for the ball, and a classic tween for the platform. I did some tweaking in the motion editor. It can definitely use more, but it will do for now.

Midterm Project ~ Jeffrey Schachtsick

To the left is just a sample frame of my project. I'm calling it UFO_visit. I felt like making this a little entertaining. The full video is on the PCC server for viewing. Anyway, to create this project I started out by creating a couple symbols: a cow, UFO, wine barrel, and wine building using various tools of primitive, objective drawing, etc. I thought it would be easier to do it this way so I wouldn't have to worry about accidentally messing up one of the objects. In Multi-layering, I found it really handy to put each layer(symbol) into a directory, so I could easily move and adjust the layers around to what I wanted to do. The light ray from the UFO was tricky and I figured out that needed to create to light beam object layers because the light beam goes in different direction and at different times. Lastly, for the UFO, I really tested the tweening ability by using many different functions, such as using motion guides and size adjusting. For the cow and wine barrel, I used spinning motions and movement.
This is fun project, and I wish I had more time to work on it to give more details.

Saturday, November 7, 2009

Midterm - Vincent Phan


My project takes place in outer space, involving a moon revolving around a planet, a UFO floating around, and a shooting star.

The planet and moon were made with simple merge and object drawing, and the moon was converted to a symbol. I applied classic tween and a motion guide to the moon so that it revolves around the planet. I also tried adding perspective to the moon by enlarging it when 'in front' and slowing the speed down as well was shrinking the object to make it seem like its getting further away.

The UFO was made with bezier curves and gradient coloring, and was converted to a symbol. I had the UFO float around the top with frame-by-frame animation

I made a small shooting star from an object drawing converted to symbol and added a tween for it to pass by for a few frames.

Stars were added to the background too, but I didn't include them to the storyboard.

Friday, November 6, 2009

Mid-term Ginnie MacPherson

Here is my mid-term project - early because my free CS4 version runs out tomorrow and I seem to be very busy in the next 5 days or so until the deadline.
The main layers are the water, land, trees, tree foliage and boat. Within each layer there are many grouped or merged objects drawn in object drawing mode.. The movie consists of repeating many shapes (water layers, trees) and moving them along from right to left as classic tweens. I created a single shape for the water variation and modified it in the properties panel after dragging the symbol back in from the library.
I drew the boat with parasol in Illustrator with pen tool and bezier curves and imported it as a single layer. To get the boat to drift downstream in a wavy motion, I used a curved motion guide.
The bouncing ball that follows the boat close to shore uses a motion tween. The ball is a primitive shape. For creating a new symbol with the one I made, the modified tint and alpha channel as well as transform scale on the single water ripple symbol will do.


Thursday, November 5, 2009

Project 3 Ginnie MacPherson

Here is a very late project 3. I completed this project by importing an image from Illustrator (the water drops) and Photoshop (the hose). I put each water drop on it's own layer to control the starting and ending position. I created the rotating, bouncing star and the motion-guide water drop by referring to the book. That's really about it. . .

Saturday, October 31, 2009

Project 3 Elizabeth Wyman

For this project I used Classic Tweens. I used different option to create different effects. I created objects that I converted to symbols as well as using symbols from the library. The hardest one was the flower. I had to create several different modifications of the flower to make it look like it was growing. I added all these symbols to my library. I used a motion guide on the circle and the polygon. I found the tutorials useful practice before starting my project to get a better idea of the time line and symbol modification.


Friday, October 30, 2009

Luciana Alberto Project 3

Here is my animated ghost. I used different layers and used classic motion, created frames and animated the image. I enjoyed doing this project, but I need to practice more flash to get better.


Lazarus Avery Project 3: Nightmare Scenario


Okay, so admittedly this project got a little strange. I admit it, alright? I know it's become some sort of nightmare scenario. I CAN say that this was because it's Halloween... but i felt I needed to get down to the root of fear, and thusly, you have this animation - the root of fear.

Can't quite figure out how to show everyone the video, but this is the middle frame. In the actual animation, the smiley flies across the screen as a classic tween. The Chuck Norris head is flying from the opposite direction using a motion path. It's also rotating the whole while. The bushes grow - this was an accident, but I liked it.

All the images are symbols, which was handy, and the I'm definitely going to keep that Chuck Norris symbol in my library for future use. For sure.

I didn't use the tutorials for this project, but I had a lot of fun making this project! Look forward to more in the future.

Christian Boneta - Project 3


My project came out of watching a movie that the super hero was to late and its basically that

6 layers total were used for this
1 motion guide layer
1 Layer for the Hero to transition around
1 Layer was for object rotation on the stick-man that's jumping and symbol color change at the end of the animation
1 layer for the background aka the ground
1 layer for the environment tree and clouds rock with blood and pool of blood at the end
1 layer for the action script command to end the movie

the tutorials were ok they read a bit odd but once you did it it made sense, Out of the 2 the chrome one was the tricky one but good practice to do still trying to do that masking one for some reason it just wont work. the only part of them i used was the action script to stop the movie.

overall the project was fun and the tutorials ok.

Brianna Barcus Project 3


This was a lot of fun to do. Turning everything into a symbol makes things a lot easier to work with too. The tutorials offered a lot of easy ideas, though I have to admit that the Alpha Mask tutorial was a little tricky. You had to follow the instructions to the letter to get it to work at all. In the end it's very satisfying to do.
The Classic Tweening is a lot of fun. As long as everything is on it's own layer everything plays nicely. It's clean and very very fun to work with. I created the clouds and the text in a separate document. Then I changed them to symbols. Then I started a new document and just brought everything in. The only thing I made new in the second document was the moon. I LOVE animating text, I think it's one of my favorite things to do. It's a lot of fun and makes things more interesting then just static text. I kept every symbol on it's own layer and animated everything from there. If you want to see it, go here~
http://sws.pcc.edu/student/CAS175_pdeangel_45513/briannabarcus50/Project_3/SWF_ProjectDocuments/project_3_motion.swf

Have a nice weekend and Happy Halloween! ~ Brianna Barcus

Darby Hasbrouck: Project 3


I just started playing with shapes and decided to have each of the shapes start at the outside and then merge together. The circle transformed and changed color while the rectangle just changed color. I also set up the polystar to rotate slightly. I wanted to give the background a texture rather than a solid color so i just created a layer that was a rectangle that would cover the entire stage. I imported the ball from the library of another project and found that to be a very helpful time saver. Creating the shape wouldn't have been all that tricky but it's quite convenient. I ended up using the ball as my motion guide for this project.
The tutorials were great practice for exploring new ways to use the tween and mask functions. The chrome tutorial was the trickiest but it was useful to help me explore more text effects.
This wasn't my most creative project thus far but it was great practice and I feel a lot more comfortable using the classic tween and motion guide functions.

Thursday, October 29, 2009

Project 3 - Vincent Phan


My project simply involves a sun rising above a hill, and then setting while the sky and the hill darken to make the setting look like daytime transitioning into night time.

I created three layers, the sun, hill, and sky, and converted them all into their own symbols. For the sun, I created a motion guide and created a motion path using the pen tool.

The sky and hill layers are both color tweens that change from light to dark.

Although I didn't apply the tutorials to my project, they were still pretty cool to follow, especially the first tutorial which provided a small taste of action script.

Nathan Davis Project 3


Here is my animation for my Project three. http://sws.pcc.edu/student/CAS175_pdeangel_45513/nathandavis21/Project_3/project3_animation_1.swf

Go ahead and look, I'll wait.

Your back? ok, good. What I did was three layers (like we had to). The first layer I used a motion guide to go to the upper right. The second layer I used a color change. On the third I used a shape change to change it into the bomb. I find that using windings, then the "break apart" tool, is a really easy and fun way to make images.

Fullmer Project 3


Thankfully I was able to supply the class with a project that doesn’t look like it was developed by a 2nd grader…although knowing my kids technical abilities in 2nd grade they may have been able to out-do me. I imported arcade buttons in three colors, blue, green and orange, from the common library. Each button was placed on its own layer. Since we can’t upload a .swf to the blog I’ll talk you through what happens in my movie. First the green button is removed, and then the blue using a few classic tweens and when the green and blue buttons appear on screen again (together), the orange button changes color to red using a color tween. All objects were converted as symbols to the library however I already had them in the common library so now I have them saved to two libraries…I believe… The tutorials helped A LOT, especially since I missed class so unexpectedly last week. Had I not had the tutorials I‘m sure it would have taken me quite a bit longer to finish my project. Stephanie Fullmer

Wednesday, October 28, 2009

Brian Jepperson - Project 3


http://sws.pcc.edu/student/CAS175_pdeangel_45513/brianjepperson77/Project3/brianjepperson_assignment3.swf


The tutorials helped. I especially liked the heartbeat and chrome ones. I can definitely see using those techniques elsewhere.


For my project, I wanted to do a Halloween themed one. I just kind of threw together a lot of elements and animated them in a fun way. Most of these shapes were done with the pen, then filled with the paint bucket, and animated. I animated the size of the bats and the ghost, and animated the alpha of the cloud and the ghost. The text I broke apart into individual shapes, applied a gradient to them, then made them symbols. That way I could animated them, although I only animated the P's. I used a motion guide for the ghost's movement.


The project is no masterpiece, but it was fun. I got to work on different animation techniques.

Tuesday, October 27, 2009

Pamela Peterson Project 3

Click for full movie


The tutorials were a great reenforcement of knowledge after doing the project. The more practice the better I get. The tutorials didn't directly contribute to my project because I didn't use any of those techniques but i really enjoyed them, especialy the alpha-mask that cost me hours and hours of trouble-shooting. But how great it feels to have done it all and accomplished it, down to the last detail.


For my project I made the firecracker and background first and made them symbols. I planned to make all the symbols then compose the movie but it was easier to just compose and make symbols as I went. It was incredibly easier than I thought and am very excited and happy about this. Obviously the motion guided symbol was the fuse, the size changing symbols were the stars, and some were even rotating, though its hard to tell. I imported the duck (cause we needed to import something) for fun, and the broken firecracker also has a 360 rotation on it. That was about it. I added a flash of light behind to add to the effect.

Monday, October 26, 2009

Jeffrey Schachtsick - Project 2


I found this out the hard way, but to manage complex graphics it is best to make the graphic as big as you can get it, group all the objects together somehow, and then size it down. With the barn, I just did it to size, but my mistake should have made it really big, so I could do all the details to it later and then size it down to the size I want. Anyway, once you have the 'perfect' graphic, make sure all the layers are in a folder and it is grouped together, so you can save it to a library.
I used a lot of lines in this one, and I'm really happy with the tree and tire swing on how that turned out. I was able to use lines and make them thicker for the fence and giving it a old western style to the fence.

Sunday, October 25, 2009

Luciana Alberto Project 2


This is definitely not a master piece, but it's as good as I can do right now, considering my conditions.
I used complex graphics and union the geometry so I could get the right shape for my ghost
I am going to try to animate the ghost's arms and make this image more presentable, I created the groups so that would make it more simple to identify the ghost parts and arranged the layers as it is because it was the logical way to make the objects visible

Friday, October 23, 2009

Project 2 - Christian Boneta


I grouped the layers in this one from back to front ground being start and dino/people middle and the moon was the masked object.
Being able to group was nice. The stacking order wasn't a problem, mask on top everything else feel behind it.I grouped most of the things on the complex layer just to keep them separate

It was very easy to use groups and layers to keep everything in perspective and very organized
For complex graphics on a single layer i would recommend grouping as much as you can.

Favorite tool was the free transform-tool again just cause it makes reshaping so easy
and being able to organize the layers

Thursday, October 22, 2009

Project 2

Ok so I have said before, I am no artist. I grouped the circles I made for the ground and the "night sky" and "moon" together, as that seemed to make sense.
I added a couple symbols to it for some added spiffyness (or at least to take some of the "suck" out of it.)
I put the castle and gound on one layer, the sky and moon on another and the symbols (cat, tree, owl) on a third. I figured that if I was going to animate them, it would make sense to have like object on same layer.
Other then that, I apologize for making you look at this abomination.

Jeff Ashmore project 2


So I used the oval tool with a blue gradient color to make the circle pyramid. Then I saved it as a background layer. Next I used the spray tool and saved it as a darker blue layer. Lastly I saved another light blue layer as outlines, which could be turned on and off. I am not really a designer or an artist, and I am finding that out pretty fast.

Project 2 - Brianna Barcus - Falling Star


This project was very neat to do. Working with layers makes everything so much easier (even when you have the flu) . I grouped a lot of things together. For static objects it makes things easier to work with. I grouped the sky together in one group, the hills in another, and the falling star in yet another group.

I couldn't make a mask look good, so I just did a really simple one. I stacked everything pretty simply. I made sure the background was at the bottom and the falling star which is the foreground was on the top.
I think if you're going to work with complex graphics you need to use grouping. And then learn to use layers. It helps out a lot when things get.... 'complex'. One of the problems I ran across was that when you have layers that over lap each other and objects in that layer overlap each other and you try to group them things get tricky. So you have to watch out for that.

All in all a pretty fun project despite the fact I have the flu. :(

BrianJ - Project 2


I spent last weekend in Tucson, so I got inspired to do some desert art. In any case, I created this using several different layers. The cacti were created with the pen tool in merge drawing mode, the sun is a primitive shape with a subtle gradient, the everything else were done as objects.

I mostly avoided issues with single layer ordering by placing things on seperate layers, but for the purpose of the assignment I put the sky, sun, and clouds on a layer, and put them in the proper order by "managing" the objects. In this case, the order I selected is based on how things would look in terms of forground, midground, background. Nothing too crazy there.

I grouped the cloud "streaks" together, so that I could keep them together. I actually attempted a lot more clouds, but in the end cut it back to what you see above, as I had trouble making good looking clouds using Flash tools. The composition was actually done in a rectangle, but I created an oval mask and added a border around it to make it look more like a button or logo or something that could be re-used.

Recommendations for single layer stacking? Probably to use the object mode and use "arrange", plus when you can identify things that should always be together, you can "group" them.

Wednesday, October 21, 2009

Project 2 - Vincent Phan

I grouped my layers for this project according to the foreground and background, with the former being the ground and the person, and everything else being the latter. I created a mask layer by creating a merged ellipse and placing a gradient object behind it.

Being able to manage graphics on a single a layer was a felt a little challenging. I had to keep in mind how the stacking order worked, and also avoid using merge shapes. It's nice being able to use groups and layers, as it helps to organize the objects, and put less stress to the brain.

Tuesday, October 20, 2009

Inspired by the fall colors - Elizabeth Wyman

Hi All.

I had fun with this project even though I had to start over. The tree trunk crashed my Flash. :o( Not sure what happened there.... Here is the final image I came up with.

I really like being able to separate different drawing elements on layers. I could see where that would be a real advantage for animated graphics as well. Grouping was also nice to use to keep elements on a single layer together and organized. Grouping also made making all the leaves I needed for the tree easier to copy, paste and transform. I enjoyed playing with the different paint brush strokes to create texture on the tree trunk.

Darby Hasbrouck: Project 2


I began by playing with the merge shape tool and that's when I created the beak which gave me the inspiration to create a little chic. Once I figured out what i was going to create I used all three types of drawing objects on a single layer to create most of the facial attributes and then I grouped them all together. All of the parts that make up the chic are in the same folder and I played around with the order so that the body shape would show up in front of the legs.
I used 3 colors with the paint brush tool to create the grass. After i created the barn and fence I tried putting the chic behind the fence but just didn't like it that way so I switched the positioning of the folders.
I grouped a lot of the attributes of the chic just because it made everything easier to work with once I knew I was happy with what I had created on each layer.
Really my main pitfall was figuring out where to use the masking feature. I finally decided to use it to create the sun. I'm feeling more and more comfortable with flash the more I play with it.

Fullmer Project 2


Well Hello again…..It is I, the one with zero artistic ability, otherwise known as a Project Manager. I have here a simple rainbow, grass, ant hill and ants. I used the oval tool, modified with the selection tool, cropped for the rainbow shape and was then built as a mask allow you to see the rainbow behind. The mask layer completely overlaps the rainbow color swatch. The color swatch was rotated to give the, somewhat, obscure rainbow effect… I first added each piece from the grass to the ant hill and finally the ants. I then grouped all the ants and the ant hill. I used the arrange tool to modify the order of objects putting the ant hill behind the grass and the ants on top of the grass. I played with the stacking order of the layers finally putting the folder and all its contents below the mask and it’s separate layer. This was more for organization than anything. Managing complex graphics on a single layer is difficult; I kept wiping out or erasing parts of my grass…..I haven’t figured this piece out entirely but I’m sure it will come in time. Thanks for your support…Stephanie

Cropped image


Well, now I see how Flash expands the drawing area when graphic items go off the edge of the area. Here is the project cropped in Photoshop.

Project 2 - Ginnie MacPherson


For the image, I created a main layer with the buildings, water and tree. I used grouping and merging with the punch and combine sub-categories. I also used the arrange feature frequently as well as the gradient and the alpha channel for transparency. Sometimes I grouped objects in order to arrange them above other objects.
The mask layer is used to put a pile of leaves into the garbage can. The final order of layers accomplished the illusions of things being in front and or behind each other in space as well as the ease of working with items while locking other inactive layers.
Grouping seems to be key in managing multiple elements in a single layer, so you can edit just that selection. My experience of the project is mainly adjusting to the difference between Flash and Illustrator drawing tools. The differences are in some cases an easy transition and in other kind of tricky.

Monday, October 19, 2009

Project 2-Slideshow cover page


I used grouping in several parts if this project and layers for just about everything. First I had to create the shamrock that would serve as a symbol for the background grid. I created it out of many things and then grouped them together until I was ready to union them together and make a symbol. Once the shamrock grid was created I made a new layer and positioned it behind the shamrock grid in order to show the shamrocks on a black background.
The wall in front was created with several layers. I first did a pencil drawing of the outline and realized I couldn’t fill it. So I used to the outline to put in rectangles and transform them to the shape seen. The hole in the center was made by masking and using different shapes to guide as I drew out a lot of it. Another shamrock was placed on top to create the appearance of the thickness of the wall within the center shamrock and then I went in with a brush to make it look more like that and not one just on top.
Throughout the wall process I was moving layers forward and backward and hiding them for the ease of seeing without having other things in the way. Then as I went along I would group them and lock the group folder so I wouldn’t keep selecting a line next to where I was trying to highlight.
The final order of the layers is so that obviously everything seen is seen the way it is. Oh, and at the end I created a layer and made a polygon with a customized gradient light and placed it between the wall folder and the background folder to appear as if there were a light source behind the wall.
The text was added at the end, each on different layers. After typing I broke all apart twice to make them merge shapes so I could transform them in ways that text doesn’t allow, i.e. distort and envelope. And the meaning of the text? Well, I figured it could be a cover of some sort for photos from my trip to Ireland with my boyfriend this coming November.
The recommendation for managing complex objects on a single layer is to not, and use multiple layers. Or if not, group or union them together to make it a little easier. The pitfall of using just one layer is that you have to be careful about what you’re selecting. Also you can’t hide other things when you want to focus on one object with nothing else showing. My preference of tools is still the brush tool and drawing objects versus merge shapes because they seem easy enough to use and morph.

Tuesday, October 13, 2009

Late Bloomer - Reineke Avery Project One


Get it?

Alright, so. The background gradient is the only primitive shape on the stage- as most of the shapes involved were irregular, that was the easiest way to go about it. The outline of the primitive shape also has the gradient, in a large sized stiple stroke. I get really cranky if my creations aren't neatly finished off, and that gave it a nice effect.

The leaves you can just barely see were done using the merged object setting and a combination of square and oval tool shapes. I drew rectangles with a custom gradient, then drew ovals right over them, deleted the ovals to create a curve on the underside of the leaf, and finally copied and pasted the leftover shape on top of itself to create the topside curve. I was pretty proud of myself for coming up with that one!

The petals of the iris are hand-drawn with the paint tool in the object setting, because I wanted to be able to move the petals around as needed to get a nice look. I filled in the petals with a custom gradient, and adjusted it using the Gradient Transform Tool. It ended up working really well for the varied colours seen on iris petals.

Finally I finished off the flower with the pencil tool in goldenrod with a large size stiple effect applied, to create an abstract stamen type shape. It also covered up a bit of the gradient paint areas that I didn't like as much!

The quote about irises was stolen from Hano No Monogatari's book The Stories Of Flowers and just happens to relate to one of my favourite cultures, that of ancient Greece. It's the same font Lazarus used on his piece, but I liked it so much I decided to use it on mine as well. :P

It was really fun learning to use the tools and I look forward to our next project!

Monday, October 12, 2009

Project One! Lazarus Avery


Man, Flash is fun, but Blogger's a beast to use! LOL - I've been trying to get this thing on here for days! Also, is it just me or is blogger REALLY hating the insertion of any file type? I exported/saved this thing in every file type I could and it just wouldn't work with Blogger! Finally I put it on Flickr and updated it.

Okay, finally got this up here, and am ready to show it around.

This project was actually an incredibly entertaining one to pull off. I think I've used every piece that we've learned, as tough as it is to actually see due to the nature of the project.

The smileys are actually all various types of shapes: Merged, which I used to create partial shapes in the background, Object Drawings, which I took off onto the paste section to fill in as I needed them, and Primative Shapes which I used for layering.

The pen tool I used for two things: The splatter affect on the right side, for one, is actually a "pen line" - just with the affect that it's very Stipled or Hatched, and with massive stroke and bounced back and forth.

I wanted the shouting by him to be very chaotic and manic, so I used the pen - hatched - to bounce all over the place. It's supposed to look exasperated and panicked.

The text, though modified, I didn't break apart due to special concerns.

Gradient Color? Only kind I use! I used a variety of gradient scales and changes in the smileys and in the guy's clothes.

The paint option is straight forward (and by far my favorite): all of the faces and free hand drawing, including the guy. The pencil is a hard tool to justify, but I did use it to emphasize the last word of the sentance.

I transformed several items here. The barrier between him and the smileys is actually a rectangle. If you look close, some of the smileys are all smooshed by the rush of the other smileys.

All in all, I believe I pulled off a fairly creative project with all the parts we learned, and can't wait to learn some more things! I wanted to use layers here, but it wasn't part of the project!